Plan Your Car Makeover: What Should You Change First?
A car makeover rarely goes wrong because of one bad part. It goes wrong because of the order. New wheels arrive before the lowering springs, and the tyres now touch the arches. A wrap goes over a scraped door, and the scrape shows through the film. A dark tint goes on the front windows, and the car fails its next inspection. Each of these costs money twice: once to fit the part, and again to put it right.
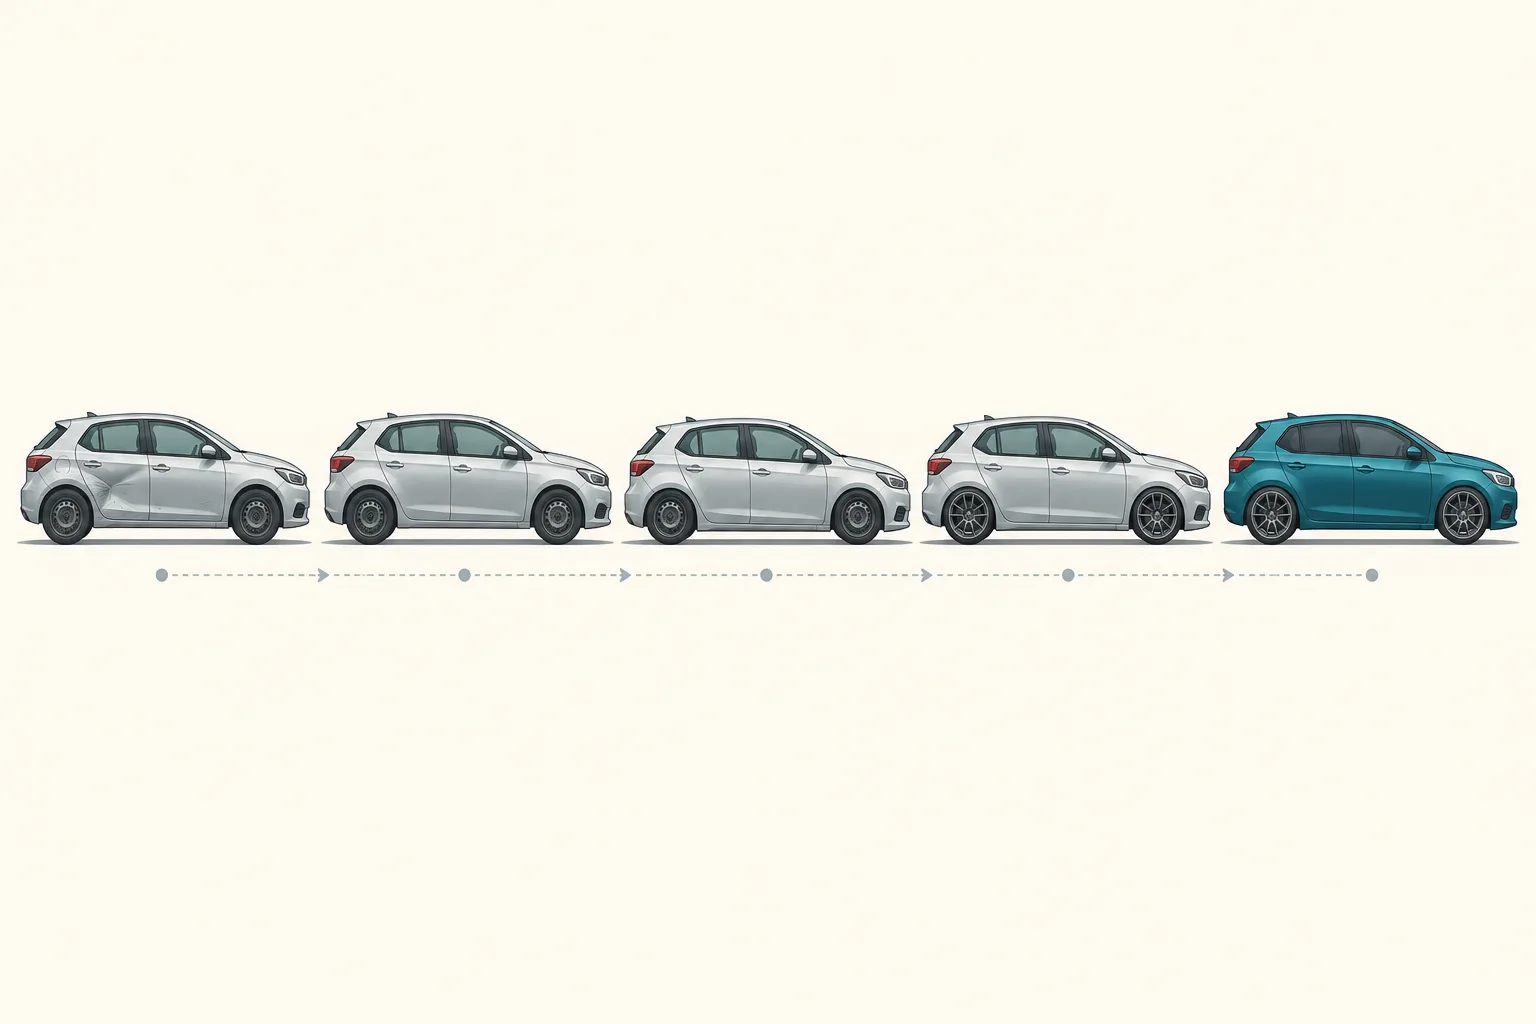
The short answer: change the things that other changes depend on first, and leave the easiest to reverse until last. In practice, that means paperwork and repairs first, then anything that changes how the car sits, then wheels and tyres, then the colour, and finally glass, lights and small details. The interior can happen at almost any point.
This guide follows that order one step at a time. For each step, it explains why it comes where it does, what to check, and who can confirm that a change suits your car. The legal details below are for Great Britain; if you live elsewhere, the principle of the order still holds, but check your own country's rules.
Start with a brief, not a parts list
Before you buy anything, write down in one or two sentences what you want the finished car to be. "A quieter, cleaner look for a car I will keep for five years" leads to different choices from "a bold show look for one summer". The brief helps you say no to parts that are attractive on their own but do not fit the whole.
Three questions shape the brief:
- How long will you keep the car? If you may sell it in a year or two, favour changes that you can reverse, such as a wrap or a set of wheels that you can sell separately, over permanent ones.
- What is the total budget? Divide it across the steps in this guide before you spend any of it. Repairs found at step two come out of the same budget as the parts you want, so keep some money in reserve.
- What must stay as it is? If the car is leased or on finance, read the agreement for conditions on changes to the vehicle before you plan anything.
Also decide what the finished car should look like as a whole. Wheels and colour affect each other: a wheel finish that looks right against the factory paint can look wrong against a new colour. Choose the combination first, then buy the parts in the order below.
Step 1: Talk to your insurer before you spend money
Insurance comes first because it can change the cost of the whole plan. The Financial Ombudsman Service advises drivers to check their policy and contact the insurer "before making any modifications" to find out what needs to be declared. Its examples include ordinary changes such as tinted windows and new alloy wheels, not only engine work.
The risk of staying quiet is real. The Ombudsman warns that if you do not declare a modification, "your policy may be invalid". A higher premium is better than no cover after an accident.
Make the call with your whole plan in front of you, not one part at a time. Ask:
- which of the planned changes the insurer needs to know about;
- whether any of them changes the premium or the excess;
- whether any of them is a change that the insurer will not cover at all;
- how to declare a change after it is done, and what evidence the insurer wants.
If one part of the plan makes the car hard or expensive to insure, it is better to find out now, while you can still change the plan.
Step 2: Fix what is worn or damaged
A makeover starts from a healthy car. There is little point in fitting new wheels to a car with worn suspension parts, or in buying a colour change before you know the bodywork needs a repair. A service and an inspection by a garage you trust show you what the car needs before you spend money on what you want.
Some checks are a legal minimum, not a matter of taste. The Highway Code says that cars "MUST have a tread depth of at least 1.6 mm", and that tyres must be inflated to the vehicle manufacturer's specification for the load. It also says that lights must be adjusted so that they do not dazzle other road users. If your tyres are close to the limit, plan to replace them with the new wheels in step five rather than twice.
Ask the garage to look at the parts that the later steps depend on:
- Suspension and steering: worn bushes, springs and dampers affect how the car sits and how new wheels behave.
- Brakes: larger or different wheels must clear the brake parts, so you need to know what is fitted.
- Bodywork: rust, dents and scrapes, because they decide what happens in step three.
Keep the inspection report. It is a record of the car's condition before the makeover, which is useful for the insurer, for an installer and for a buyer later.
Step 3: Repair the paint before you change the colour
A wrap is a thin film. It follows the surface under it, so it does not hide damage; it shows it. The film can also fail on a poor surface, and paint that is not well bonded can come away with the film when it is removed later.
3M's instruction bulletin for colour-change wraps tells installers to "ensure the paint is sound" before they apply the film. It lists the defects to look for, including "loose paint, dents, surface damage, rough surface, fillers used for damage, rust, or blistered paint". It also says that primer on bad paint spots "does not guarantee success", and that 3M gives no warranty for paint damage that occurs when a graphic is removed. A good installer will inspect the car, photograph the problem areas and record them before work starts. 3M recommends exactly this with a pre-installation inspection record.
On the other side, 3M's answers on its 2080 wrap film say that the film "should not damage an OEM paint finish upon removal" when it is applied, maintained and removed to 3M's instructions and within the warranty period. OEM means the original factory paint. The condition matters: the claim is for sound factory paint, not for a panel with a poor repair.
So the order is:
- Repair dents, rust and damaged paint with a body shop.
- Ask the body shop how long the new paint needs before film can go on it, and give the installer that information. Different paint systems need different times.
- Then wrap or paint the car.
If you choose a full respray in place of a wrap, the same logic applies with more force: bodywork repairs and any panel changes come before the paint, never after.
Step 4: Decide on ride height before you choose wheels
If you plan to lower the car, or to raise it, make that decision before you choose wheels. Ride height changes the space that the wheel and tyre have to move in, and it changes the angles at which the wheels sit.
Spring makers say this in their own instructions. Eibach's installation sheet for one of its lowering spring kits tells the fitter to inspect and, if necessary, adjust the wheel alignment ("camber, caster & toe"), the "tire and/or wheel fender clearance", the brake line clearance, and the sensors of the anti-lock brakes. It also says that a "full vehicle alignment using factory specifications" is necessary after installation. That is one manufacturer and one kit, but the checks are the ones to ask about for any suspension change.
The terms are worth a short explanation. Camber is the tilt of the wheel in or out when you look at the car from the front. Toe is whether the fronts of the wheels point slightly towards or away from each other. Caster is the tilt of the steering axis when you look from the side. A change in ride height can move all three, and the alignment puts them back within the settings that the car needs.
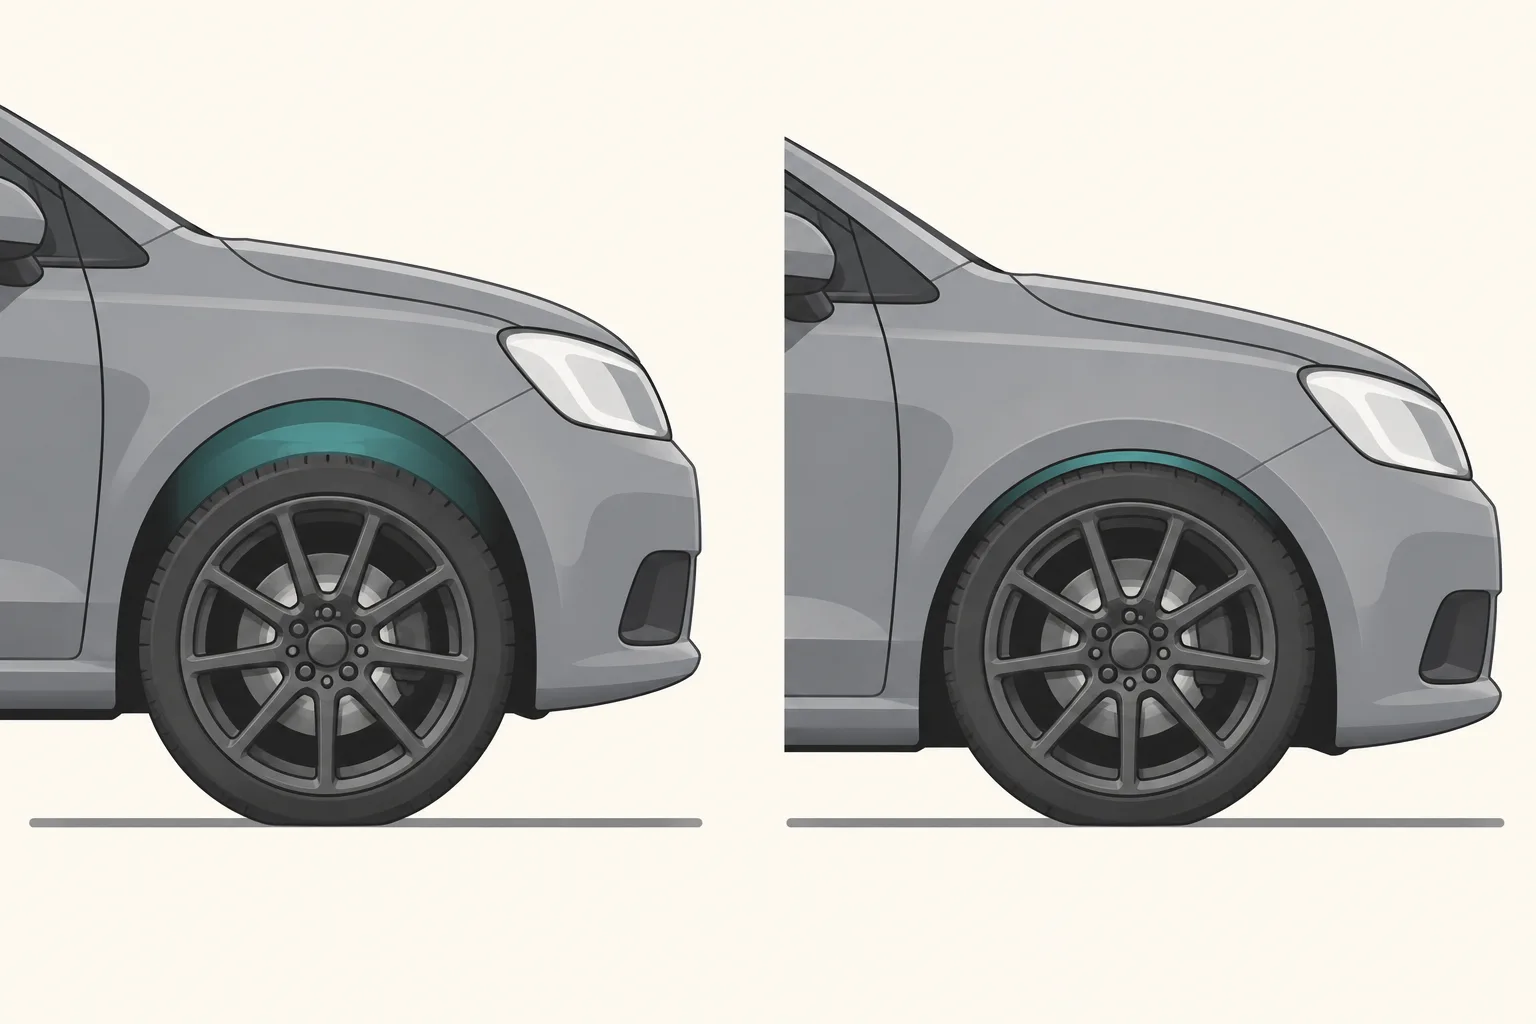
The practical consequence is simple. A wheel and tyre package that fits a car at its standard height may not fit after lowering, and the clearance must be right with the steering at full lock and the suspension compressed, not only when the car is parked. If you buy wheels first and lower the car later, you ask the wheels to fit a car that does not exist yet. Settle the ride height, have the alignment done, and then let the wheel supplier confirm a package for the car as it will be.
If you do not plan to change the suspension, skip this step. Many good makeovers never touch it.
Step 5: Choose wheels and tyres as one package
Wheels and tyres come next because the colour decision in step six works best when you know which wheel will be on the car. Start with what your car is approved for. Michelin's tyre guide points to the owner's manual and the sticker in the driver's or passenger door opening as the places to find the sizes. Note the brake package and trim too, because two versions of the same model can have different requirements.
If you want a larger wheel than the car has now, the tyre has to change with it. Continental's guidance on up-sizing sets out the main conditions:
- the load capacity "must be equal to or greater than" the original tyre fitment;
- use only industry-approved combinations of tyre size and rim width;
- keep the original rolling circumference "as closely as possible";
- make sure there is enough body and chassis clearance "under all service conditions".
The last point is where step four matters. Give the supplier the car's final ride height and the details of the suspension change, and ask them to confirm the complete package: wheel size, width, offset, tyre size, load and speed ratings, and the fixing hardware. A tyre specialist or the vehicle manufacturer can tell you whether a package suits your exact car; a photo of someone else's car cannot.
Two other points belong in this step. First, if your tyres were near the legal limit in step two, this is the time to replace them, once. Second, if you change the wheels, tell your insurer, as the Ombudsman lists alloy wheels as an example of a modification to declare.
Step 6: Change the colour
With the paint repaired, the ride height settled and the wheels chosen, you can change the colour with confidence. You now know exactly which wheel finish and stance the colour must work with.
This is also the step where a mistake is most expensive, so it pays to see the combination before you commit. With ImagineMyRide, you specify your car from a catalogue by make, model, generation and trim, then preview real wrap colours and finishes from manufacturer catalogues together with a wheel choice. You can compare several ideas side by side and share them with a friend or an installer before anyone orders film.
If you choose a wrap, plan the days around the installation. 3M's colour-change bulletin tells installers to keep the vehicle above 16 °C (60 °F) for at least 12 hours after application before it goes into cold or wet conditions, and not to wash the car for at least 72 hours. Other film makers have their own instructions; ask your installer for the aftercare of the film they use. 3M also recommends that a professional removes the film later, so include that in your plan if you may want the original colour back.
There is also paperwork. GOV.UK says that you must update your V5C (the vehicle registration certificate) when you change the vehicle's colour. The page does not say whether a vinyl wrap counts as a colour change, so ask DVLA how it treats your case, and keep the answer. Tell your insurer about the colour change too.
Step 7: Finish with glass, lights and details
Window tint, lighting and small trim items come last. They are quick to change, and they often look best when you choose them against the finished colour and wheels. They are also the area where a small change most easily breaks a rule.
Window tint. In Great Britain, the rules on tinted windows say that, on a vehicle first used on or after 1 April 1985, the front windscreen must let at least 75 % of light through, and the front side windows at least 70 %. On older vehicles, both must let at least 70 % through. There are no rules for the rear windscreen and rear passenger windows. Police and DVSA examiners can measure the tint, and the penalties include a prohibition notice that stops you using the car until the extra tint is removed. Ask the installer to measure the light through the finished glass.
Lights. The Highway Code says that lights must be adjusted so that they do not dazzle other road users. If you change headlamps or bulbs, have the beam aim checked afterwards, and ask the vehicle manufacturer or an MOT tester whether the change is acceptable for your car.
Number plates. Do not let a style change reach the plates. GOV.UK says that you cannot rearrange or alter the characters so that they are hard to read, and that you could be fined up to £1,000. The car will also fail its MOT.
Tint and trim changes are also modifications that the insurer may want to know about. The Ombudsman names tinted windows in its examples.
Where the interior fits
The interior is the one area you can do at almost any point, because it does not depend on the outside of the car. Seat covers, mats and trim panels affect neither the wheel fitment nor the paint.
There are two exceptions. First, if the interior colour will match or contrast with the new exterior colour, choose them together, as with the wheels. Second, before you change seats or trim near airbag covers or other safety equipment, ask the vehicle manufacturer or a specialist.
The order at a glance
| Step | What to do | Why it comes here |
|---|---|---|
| Brief | Set the goal, the budget and what must not change | Every later choice is checked against it |
| 1 | Talk to the insurer | It can change the cost or the shape of the plan |
| 2 | Service, inspect and repair | Later parts depend on a healthy car |
| 3 | Repair the paint and bodywork | A wrap shows damage under it; new paint needs a sound base |
| 4 | Decide the ride height, then align | Wheel clearance and angles depend on it |
| 5 | Choose wheels and tyres as a package | The colour must work with them |
| 6 | Change the colour | Do it once, on a prepared car, with the wheels known |
| 7 | Tint, lights and details | Quick to change; easiest to judge against the finished car |
| Any time | Interior | It does not depend on the exterior |
Not every makeover has every step. A colour change on a car in good condition may need only steps one, two, three and six. The order of the steps that you do keep is still the same.
Keep a record as you go
Keep one folder, on paper or on your phone, for the whole makeover:
- the insurer's confirmation of each declared change;
- the inspection report and repair invoices from step two and step three;
- the installer's pre-installation record and photos, if they made one;
- the alignment printout from step four;
- the wheel and tyre specification that the supplier confirmed;
- the product name and colour code of the wrap or paint, and its aftercare instructions;
- the tint measurement, and DVLA's answer about the colour.
This record helps with a claim, a warranty question or an inspection, and it shows a future buyer what was changed and by whom.
In short
Plan the whole car first, then work from the foundations up: insurance, repairs, paint, ride height, wheels, colour, details. Each step prepares the ground for the next, and each one is checked once, by the right person, before you spend money on the step after it. Preview the combination before you buy, keep the receipts and the confirmations, and you will pay for each change only once.