Two-Tone Car Colour Ideas: Finding the Right Combination
A good starting point for a two-tone car is a body colour you already like, a contrasting roof, and a clear decision about where the second colour stops. If you want a more distinctive result, move the contrast onto larger panels. If you want a smaller change, try mirror caps or a narrow lower-body accent.
The colour pair matters, but so does its placement. Sage green with black on the roof is a different proposal from sage green with black across the lower doors. Decide what you want the contrast to emphasise before you choose the exact shades.
Here is a practical way to explore the options, compare finishes and give a wrap installer a brief they can quote.
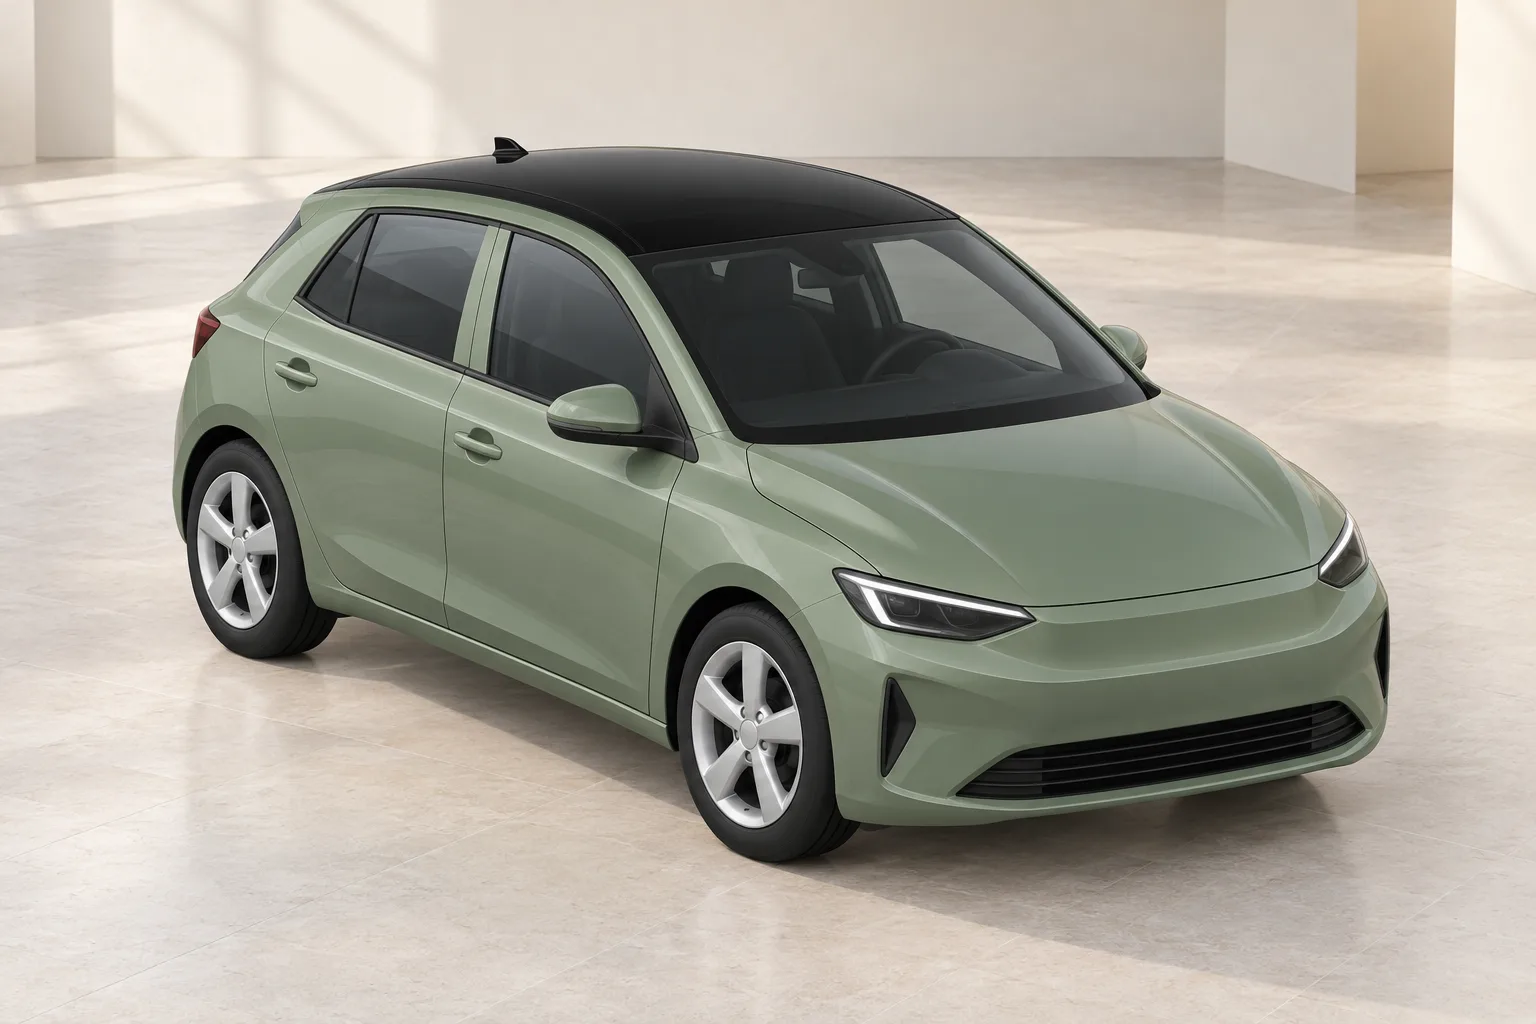 A sage-green body with a black roof keeps the colour boundary above the windows. Original AI-generated illustration created for this article; colours are illustrative.
Start with one main colour and one clear role
Choose the colour that should define the car first. That might be its existing paint, a favourite wrap colour or a shade that suits the look you want. Then give the second colour a specific job: separate the roof, emphasise a panel line or repeat a small detail.
For a first shortlist, try one dark neutral, one light neutral and one coloured alternative alongside the main colour. On a blue body, that could mean charcoal, ivory and muted copper. You do not have to like all three; the comparison helps you decide whether you want a quiet contrast or an obvious colour statement.
Look at the car's existing black glass, window surrounds, wheels and bright metal trim. Include these in the proposal. A two-colour body treatment can still sit alongside several other finishes, so decide which details you want to keep before adding more accents.
Think about the shape you want to see from across a car park. A roof treatment concentrates the change high on the car. A lower-body treatment places it along the sides. Small accents give you a way to introduce the second colour without assigning it a large panel.
Use these as separate proposals at first. Once you prefer one arrangement, refine the shades within it. Changing the roof, wheels, trim and body colour simultaneously makes it harder to identify the choice you actually like.
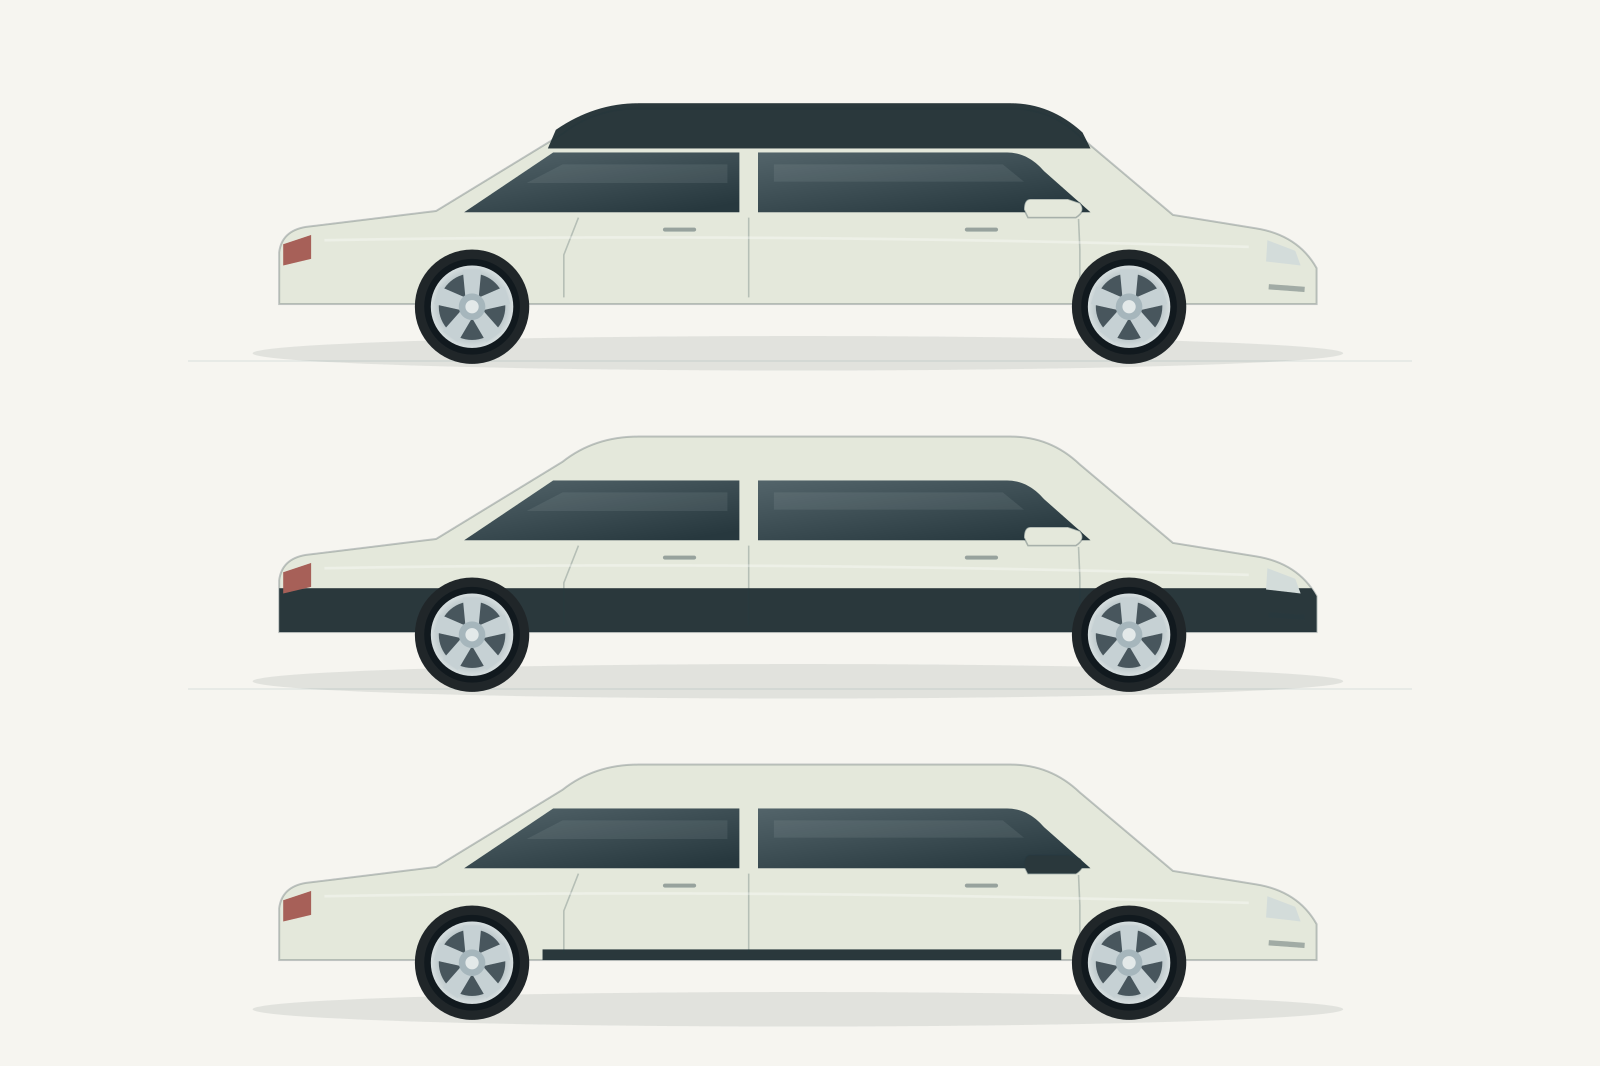 From top to bottom: roof contrast, lower-panel contrast, and mirror-and-sill accents. The same two colours and body shape isolate the placement decision. Original hand-authored SVG illustration created for this article.
Use a contrasting roof to define the upper body
A black roof is a useful first proposal for a light or vivid body colour. Compare it with the dark window glass and decide whether you want those areas to form one visual group. For a dark body, try a light roof as well: ivory, soft white or silver gives you a different starting point.
There are factory examples to study. MINI's 2021 model announcement describes contrasting roof colours and exterior mirror caps. Use that as a placement reference rather than an instruction to copy a particular manufacturer's colour.
The important choice is the boundary. Will the second colour cover only the roof surface, or continue down the pillars, the upright body sections around the windows? Will the rear spoiler match the roof or the body? Draw these decisions into the proposal, because “black roof” leaves them unresolved.
Compare two versions: one with body-coloured pillars and one with a darker upper section. Look particularly at the rear side windows and the join above the tailgate. Choose the version whose boundary you prefer from both the side and the rear.
Account for the actual roof equipment. Ask the installer to identify the treatment around roof rails, an aerial and any glass opening. Keep glass outside the wrap proposal unless a specialist confirms an appropriate separate treatment.
Before you approve the film, ask for the warranty terms that apply to the roof. 3M's Series 2080 product bulletin lists the angle of sun exposure among factors that affect performance and directs readers to the relevant warranty region. Confirm the coverage for your roof and chosen film with the installer.
Give panel splits a line to follow
For a larger two-tone treatment, start with a line the car already gives you: a crease along the doors, the edge below the windows or a defined lower sill, the strip of bodywork beneath the doors. Sketch the division onto the whole car before selecting individual panels.
A low split could place charcoal beneath a silver or pale blue body. A higher split could pair a deep burgundy lower body with a cream upper section. These are styling proposals, so judge them on your car's proportions rather than assuming a combination will transfer from another model.
Decide how the line continues around the front and rear. A division that looks complete in profile may leave an awkward change at a bumper corner. View the proposed bonnet, doors and tailgate together, and ask the installer how the boundary will cross curved surfaces.
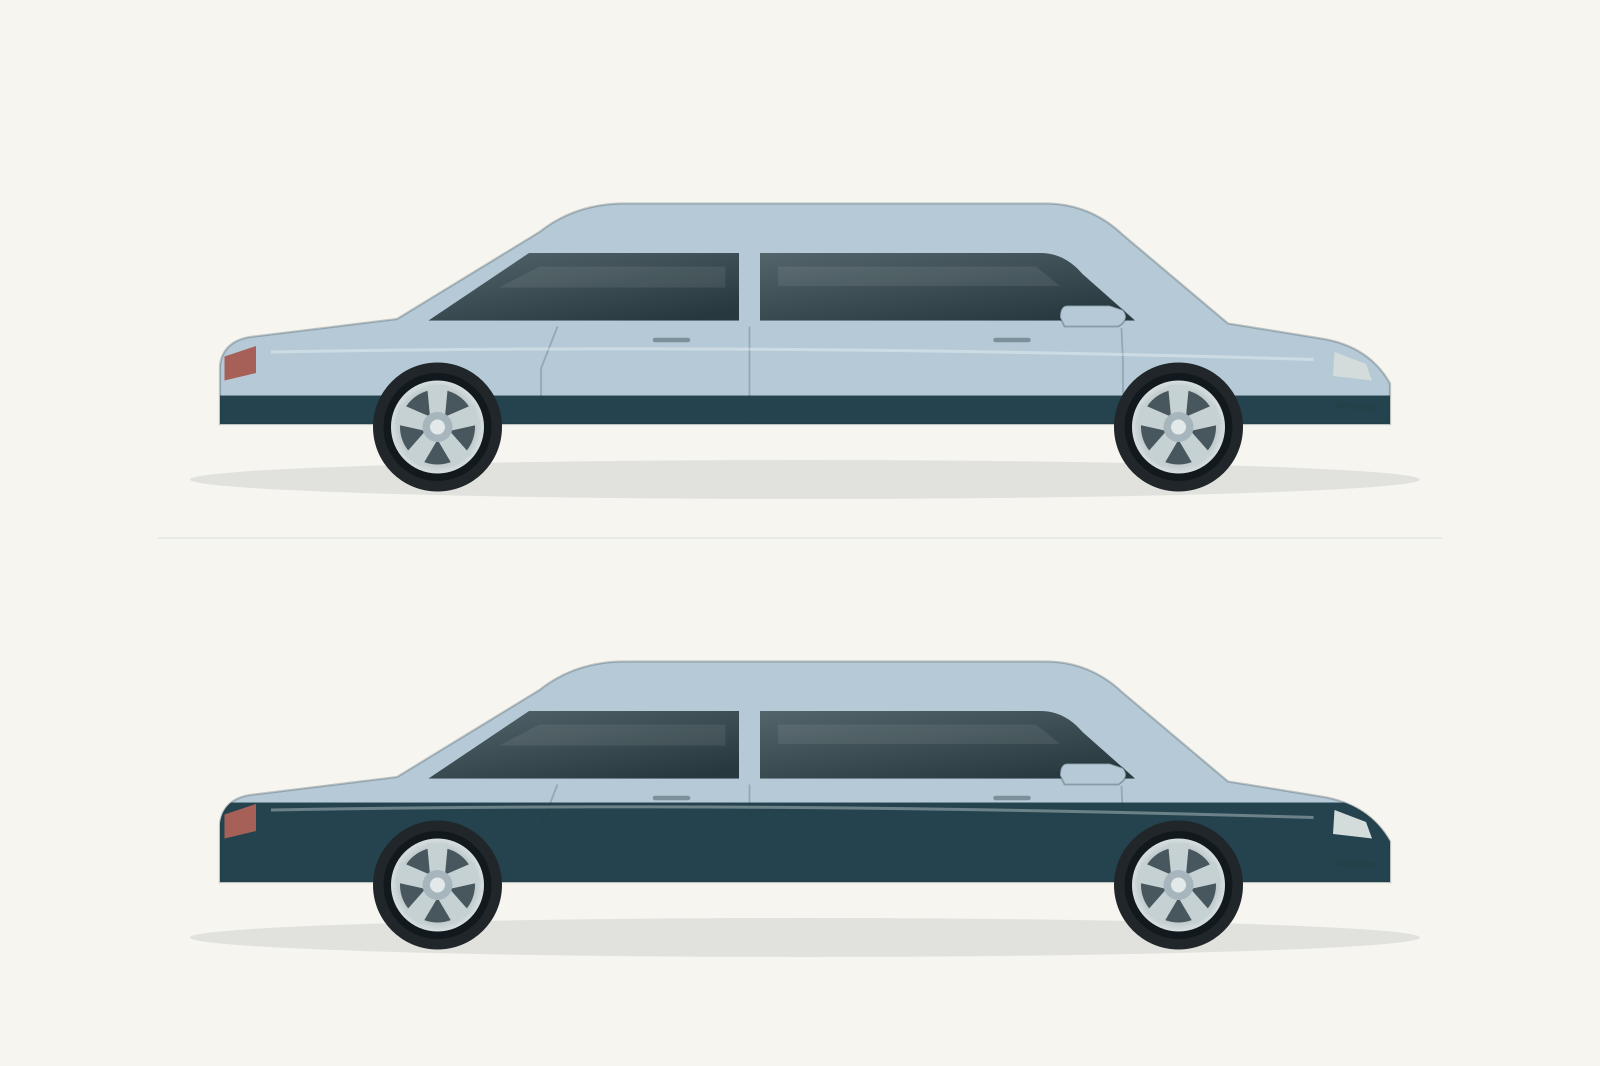 From top to bottom: a low split beneath the main door surfaces, then a higher split across the doors. The colours and car remain the same. Original hand-authored SVG illustration created for this article.
A roof colour can also continue onto a larger rear section. Toyota describes this approach on the 2026 C-HR's optional bi-tone+ treatment, which combines black across the roof and rear body panels. That is one factory example of a connected treatment beyond the roof.
If you prefer a single contrasting bonnet or tailgate, compare it with a version that repeats the colour elsewhere. Decide whether the isolated panel looks deliberate to you from every angle. A strong panel contrast deserves that extra comparison.
Ask how any mid-panel boundary will be made and finished. Agree on visible joins and their positions before work begins. The illustration is a design brief; the installer must confirm a workable method for the selected film and bodywork.
Choose a colour pair you want to see every day
Use the following combinations to build a shortlist. The names describe colour families, not specific paint codes or wrap products. Ask for real film samples before treating a pair as a final specification.
| Main body colour | Second colour | Where to try it | What to compare |
|---|---|---|---|
| White or pearl white | Gloss black | Roof and optional mirror caps | A roof-only version against one that includes the spoiler |
| Deep navy | Soft silver | Roof or upper body | A pale silver against a darker metallic grey |
| Sage green | Ivory | Roof | A warm ivory against a cleaner white |
| Sage green | Charcoal | Roof or lower panels | A roof boundary against a low side split |
| Burgundy | Cream | Roof or upper panels | A small light area against a larger upper section |
| Silver | Dark teal | Roof and mirror caps | Teal against a neutral charcoal alternative |
| Warm grey | Muted copper | Mirrors or a narrow lower accent | A restrained accent against a larger panel |
| Yellow | Black | Roof | A roof-only treatment before adding further black details |
For a restrained shortlist, begin with white and black, navy and silver, or sage and charcoal. Keep the second colour on one clearly defined area. For a softer direction, compare sage and ivory or burgundy and cream. For something less conventional, try silver with dark teal or warm grey with copper.
Compare how light or dark each sample looks, not just its colour name. If both shades look similar from a distance, decide whether you like that subtle separation. If the contrast is immediate, check that you still like the larger area it creates on the car.
Give warm and cool alternatives a fair comparison. Put ivory and bright white beside the same green body, for example, rather than choosing a white in isolation. Likewise, compare copper and silver against the same grey.
Choose a combination that suits how you want the car to look on an ordinary day. An unusual pair can be satisfying, but it should remain your preference outside a carefully lit showcase image.
Choose the finishes together
Specify a finish for each colour. Compare two gloss samples if you want both areas to share a shiny appearance. Try a satin body with a gloss roof if you want a difference in sheen as well as colour. For a matt treatment, compare the complete pair before adding glossy accents.
The terms gloss, satin and matt identify broad finish choices, but they do not replace a product name. 3M's Series 2080 brochure shows several finish families. Confirm the exact products available for your proposal with the installer.
View the samples together in daylight and shade. Place them beside the existing paint and trim that will remain visible. Ask the installer to show a larger sample if a small chip leaves you uncertain, especially for a metallic or colour-shifting film.
Film direction also matters for some products. Avery Dennison's Supreme Wrapping Film instructions identify directional finishes in its metallic, matt and ColorFlow ranges. The document requires consistent application orientation between pieces and recommends material from the same production batch.
Ask how the shop will preserve that direction when the second colour appears on several parts. This matters to the specification even when those parts are separated by the main body colour.
Record each chosen film's manufacturer, range, colour name, product code and finish. Approve the physical pair together. Ask for care instructions for both materials, particularly when the proposal mixes finishes. Keep those instructions with the quote so the finished design has a clear maintenance plan.
Use accents to repeat the second colour
If a full panel contrast feels excessive, begin with a smaller proposal. Try mirror caps, a narrow sill accent or one defined piece of exterior trim. Choose the part because you want to emphasise it, and then consider whether the same colour needs another appearance elsewhere.
For a roof treatment, compare matching mirror caps with body-coloured ones. Either can be a deliberate choice. If the roof already gives you enough contrast, there is no need to repeat it on every available surface.
Small accents also have factory precedents. Citroën's 2024 C3 announcement describes exterior colour clips in red, yellow and white. The useful idea is selective placement: a second colour can occupy a small detail.
For a warm grey and copper proposal, try the mirrors alone first, then compare a version with a narrow copper detail along the lower body. Leave the wheels and existing trim visible in both comparisons. Decide whether the repetition adds something you want.
Treat the wheel finish as part of the composition even if you plan no wheel change. Compare your proposed body colours with the wheels you actually own. If you already have a strong bronze or polished metal finish, include it when deciding how many other accents to introduce.
Give the installer a precise list of parts. “Copper accents” does not say whether handles, mirrors, spoilers and trim are included. Ask the shop to confirm which surfaces are suitable for the selected film and which components should remain uncovered. Keep lights, cameras and functional openings outside the styling brief.
Test the combination on the whole car
Make a small set of alternatives with the same body colour. One could have a dark roof, another a light roof, and another a low panel split. Keep the wheels, background and viewing angle consistent wherever possible so the placement change remains easy to judge.
Review the side, front three-quarter and rear three-quarter views. Use the side view to compare the division along the doors. Use the angled views to check the roof, bonnet and bumper transitions. Include an elevated view when the roof is the main contrast area.
For the main colour shortlist, ImagineMyRide lets you specify your vehicle from its catalogue and compare AI-generated previews using real wrap colours and finishes. You select the car's specification rather than upload a photograph. Use those previews to explore the overall direction, then agree the two-colour boundaries with the installer.
Keep the visual proposal and material approval as separate decisions. A preview helps you decide where you want contrast. 3M's colour brochure notes that screen and printed representations of metallic and pearl colours are approximate. Approve the actual films together using physical samples. Ask for an installer mock-up where an exact panel division is central to the design.
Compare the favourite proposal with a simpler version. Remove one repeated accent or shorten the contrasting area, and see which you prefer. This is particularly useful when a roof colour continues down the rear bodywork.
Then leave the shortlist for a day and review it again in ordinary light. Describe the favourite in one sentence: “sage body, charcoal roof, green pillars and mirrors”, for example. If that sentence still leaves several parts unresolved, clarify them before requesting the final quote.
Give the installer a complete colour brief
Turn the chosen proposal into a written specification. Include the car's model and body style, the surfaces to cover, the surfaces to retain, both film product codes and the finish of each. Attach the agreed views, but describe the boundaries in words as well.
For a roof design, specify the pillars, spoiler, aerial and roof rails individually. For a side split, identify the line across each door and its route around the bumpers. Include the handles, mirror caps and fuel flap in the brief so nobody has to infer their colour.
Ask the installer to inspect the paint before quoting the final work. Tell them about repairs, resprays or existing film. Avery Dennison's preparation guidance warns that poorly adhering paint layers can lift when film is removed. The shop must assess your car rather than promise a universal removal result.
Ask the quote to identify preparation, trim removal, joins, edge finishing and the warranty for each material and surface. Also ask how a damaged section would be replaced later. Keep the approved product codes and sample references with the job record.
Confirm the insurance requirements before installation. Admiral's guidance requires its customers to report planned cosmetic changes in advance; your insurer's requirements may differ. Ask how the proposed wrap affects your own cover.
Check the registration requirements in your country too. In the UK, DVLA lists colour among changes that require a V5C update. Confirm how your particular two-tone proposal should be recorded rather than assuming every partial wrap has the same answer.
You are ready to choose when you like the pair on the whole car, approve the real samples together, and can describe exactly where each colour begins and ends.